
What Auto-Stack by Capture Time actually does
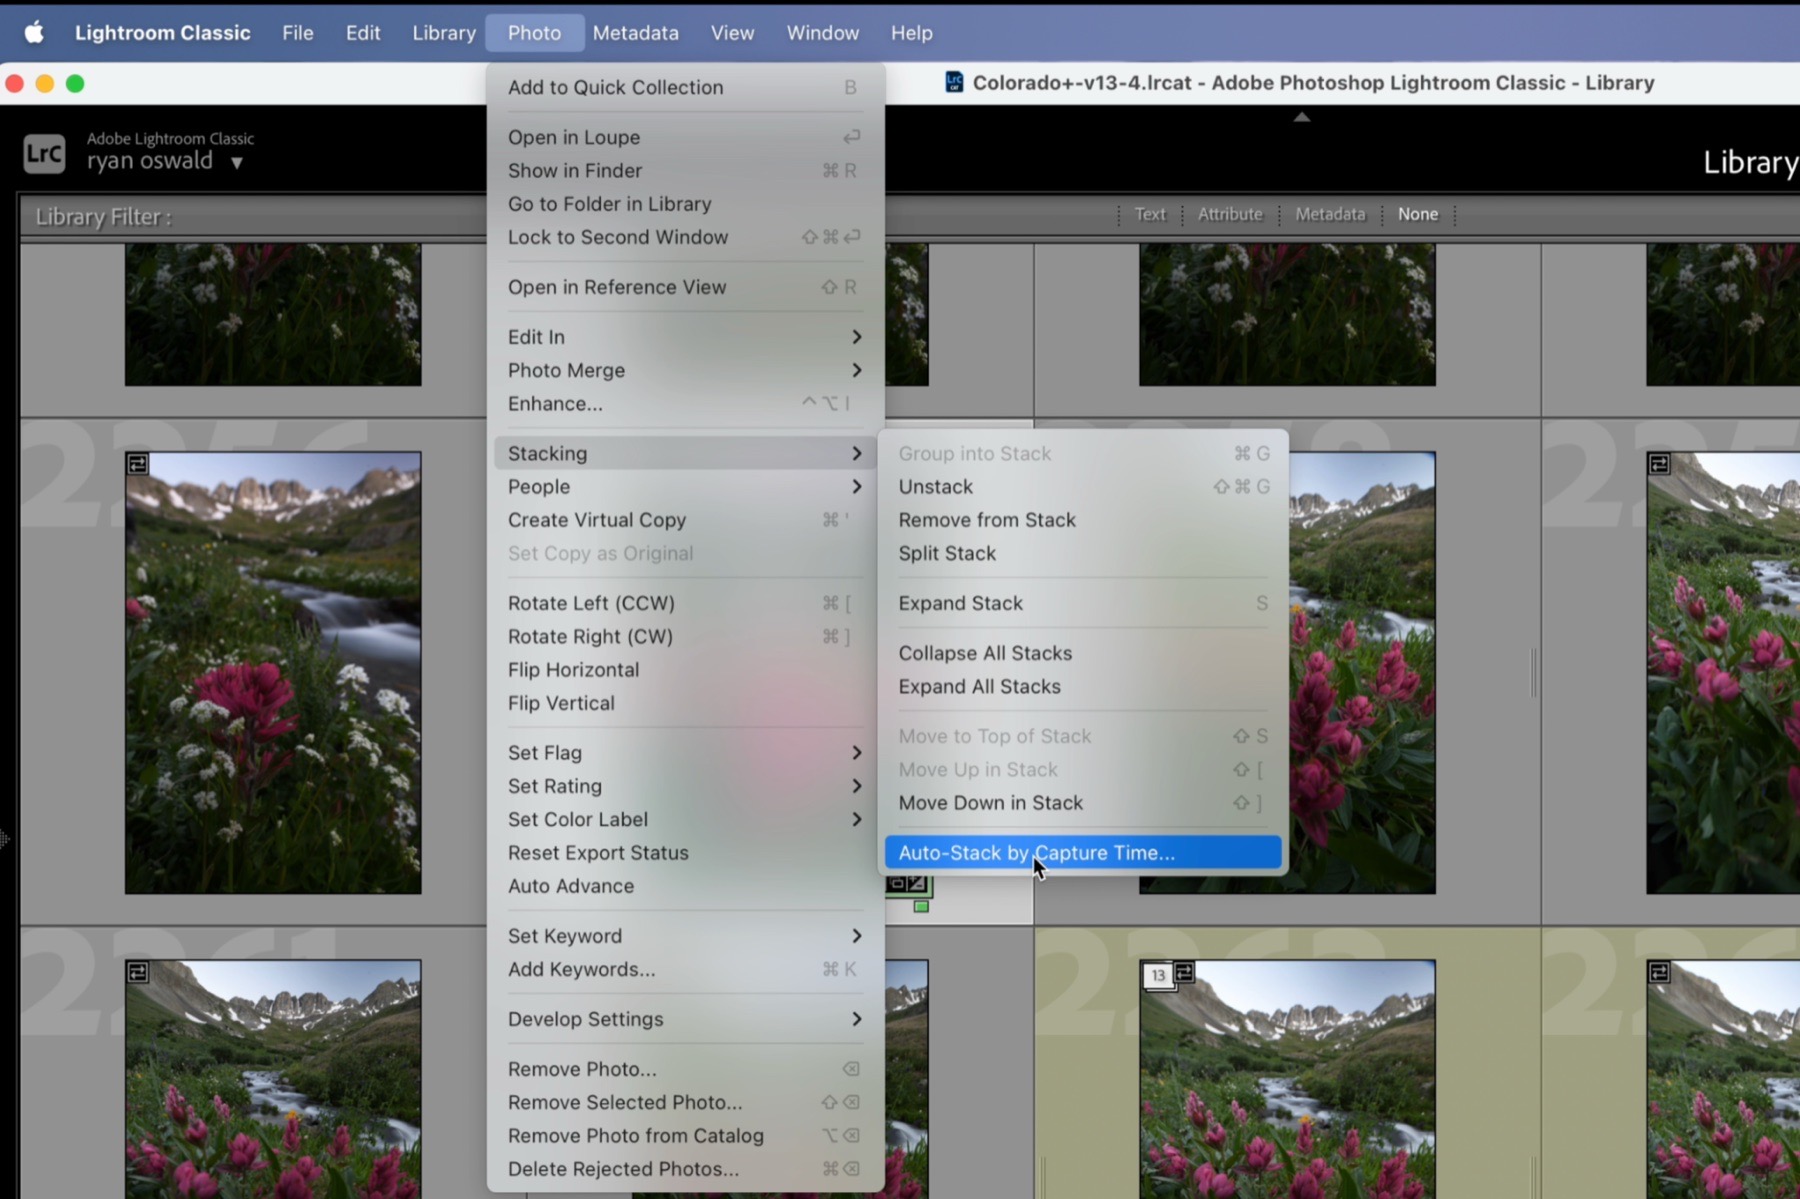
Quick answer: In the Library module, choose Photo → Stacking → Auto-Stack by Capture Time. Set the gap that should start a new stack, check the predicted result and click Stack.
Lightroom Classic reads the timestamps of contiguous photographs. Frames closer together than the chosen interval stay in one stack. When the next frame is far enough away, Lightroom starts another stack. It does not compare the subject or recognize what happened in the frame.
That simple rule becomes useful for wildlife. I shoot an action in a burst, pause and start again when the next behavior begins. Those pauses can turn into stack boundaries, so takeoff, a fishing attempt, a chase and a landing become separate groups instead of one long wall of thumbnails.
This guide focuses on Lightroom Classic's long-standing Photo → Stacking → Auto-Stack by Capture Time command. Lightroom Classic 15.4 also includes Assisted Culling → Auto Stack, which can group by time or visual similarity and choose a top photo. Cloud-based Lightroom has a similar Stack workflow for cloud photos. The interfaces differ, but the traditional command remains useful when you want direct control over the time gap that separates shooting events.
Control the scope before you stack
This is the warning most tutorials miss: Auto-Stack by Capture Time applies to every photograph in the folder or collection you chose. Highlighting a few thumbnails in Grid view does not limit the command to that arbitrary selection.
Before opening Auto-Stack, select one folder or one regular collection in the left panel. If you only want to organize part of a shoot, put those photographs in a temporary regular collection and run the command there. Lightroom Classic cannot build one stack across folders. Stacking is not available in Smart Collections or Published Collections.
For a wildlife day with several locations or cameras, I separate the shoot by folder or collection first. That keeps a test interval from reorganizing unrelated files. If two camera clocks were not synchronized, correct the capture times before relying on the gaps.
Auto-stack the folder or collection in four steps
Work in the Library module and sort the source by capture time. Then use this sequence:
- Choose Photo → Stacking → Auto-Stack by Capture Time.
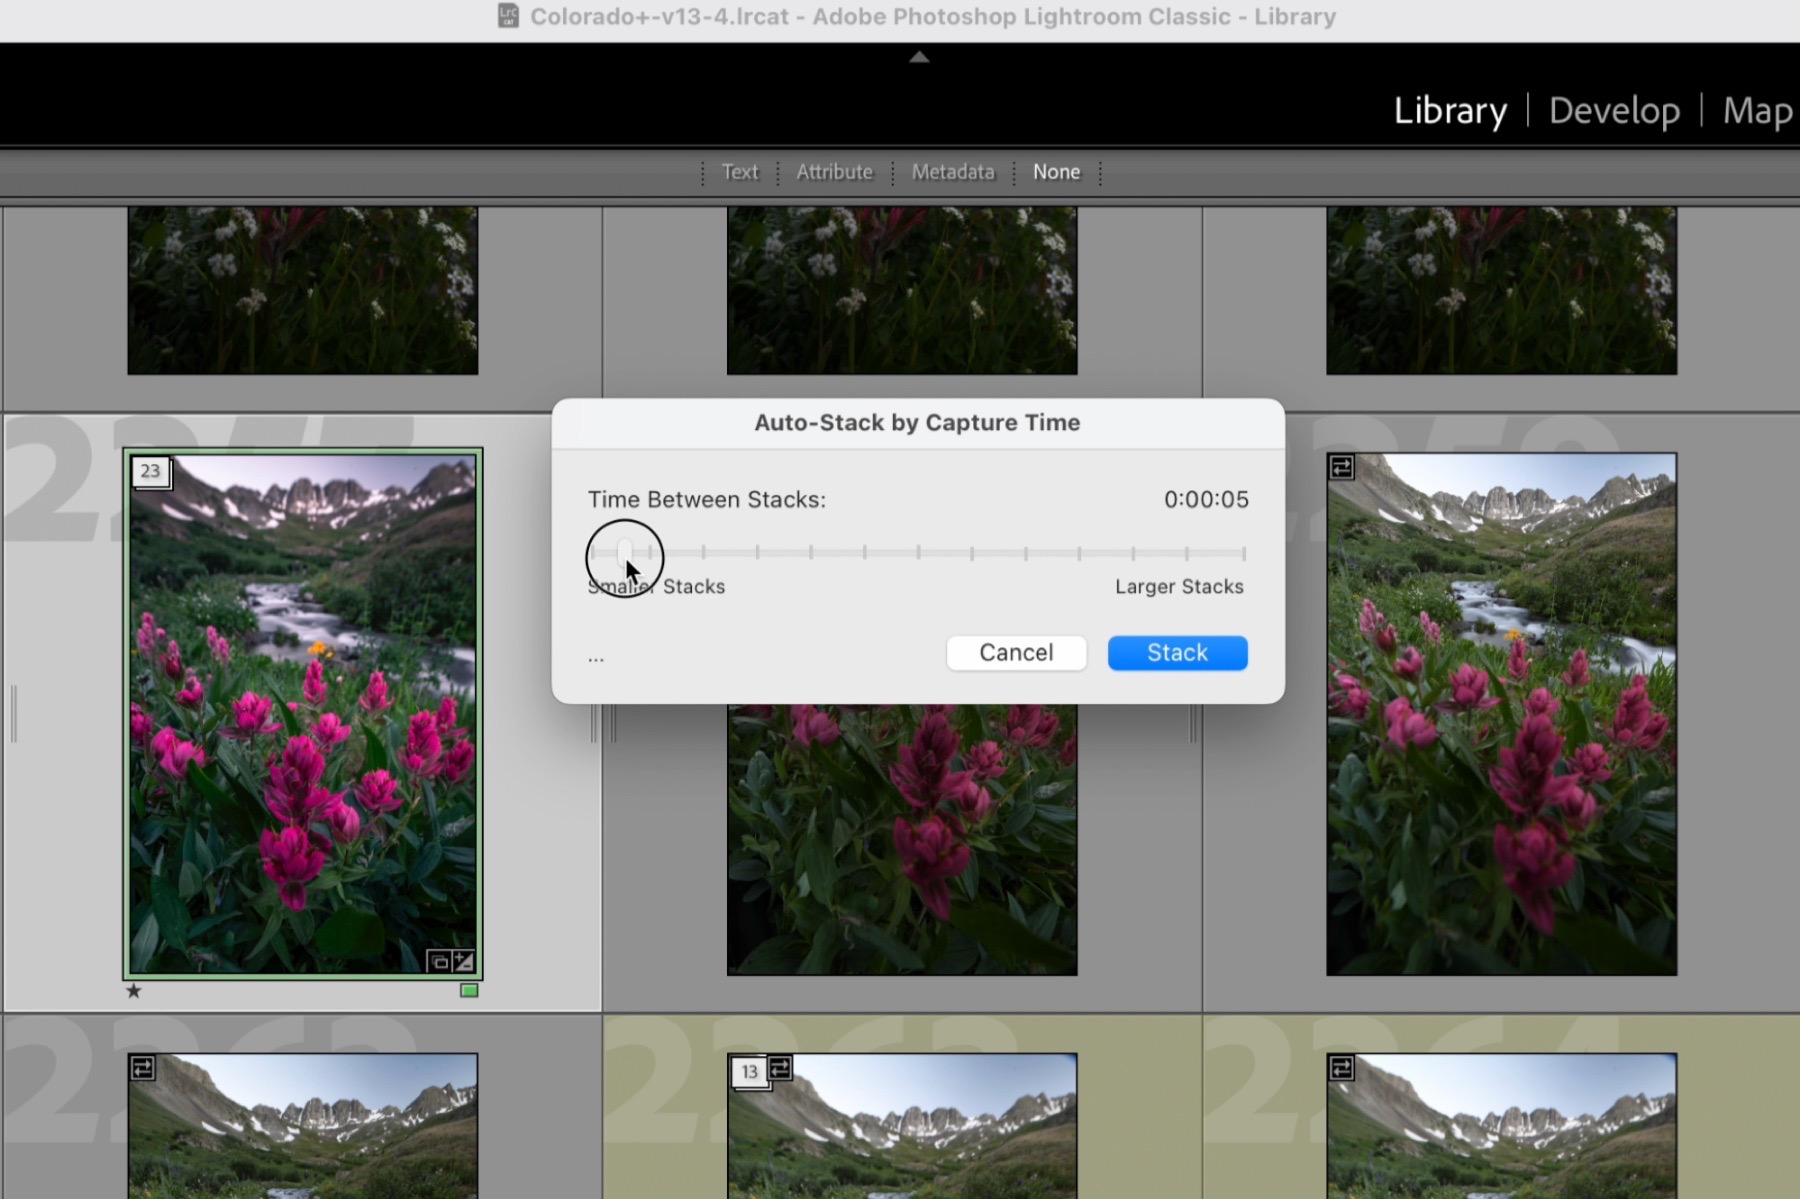
- Move the Time Between Stacks slider. Shorter intervals create more stacks; longer intervals create fewer.
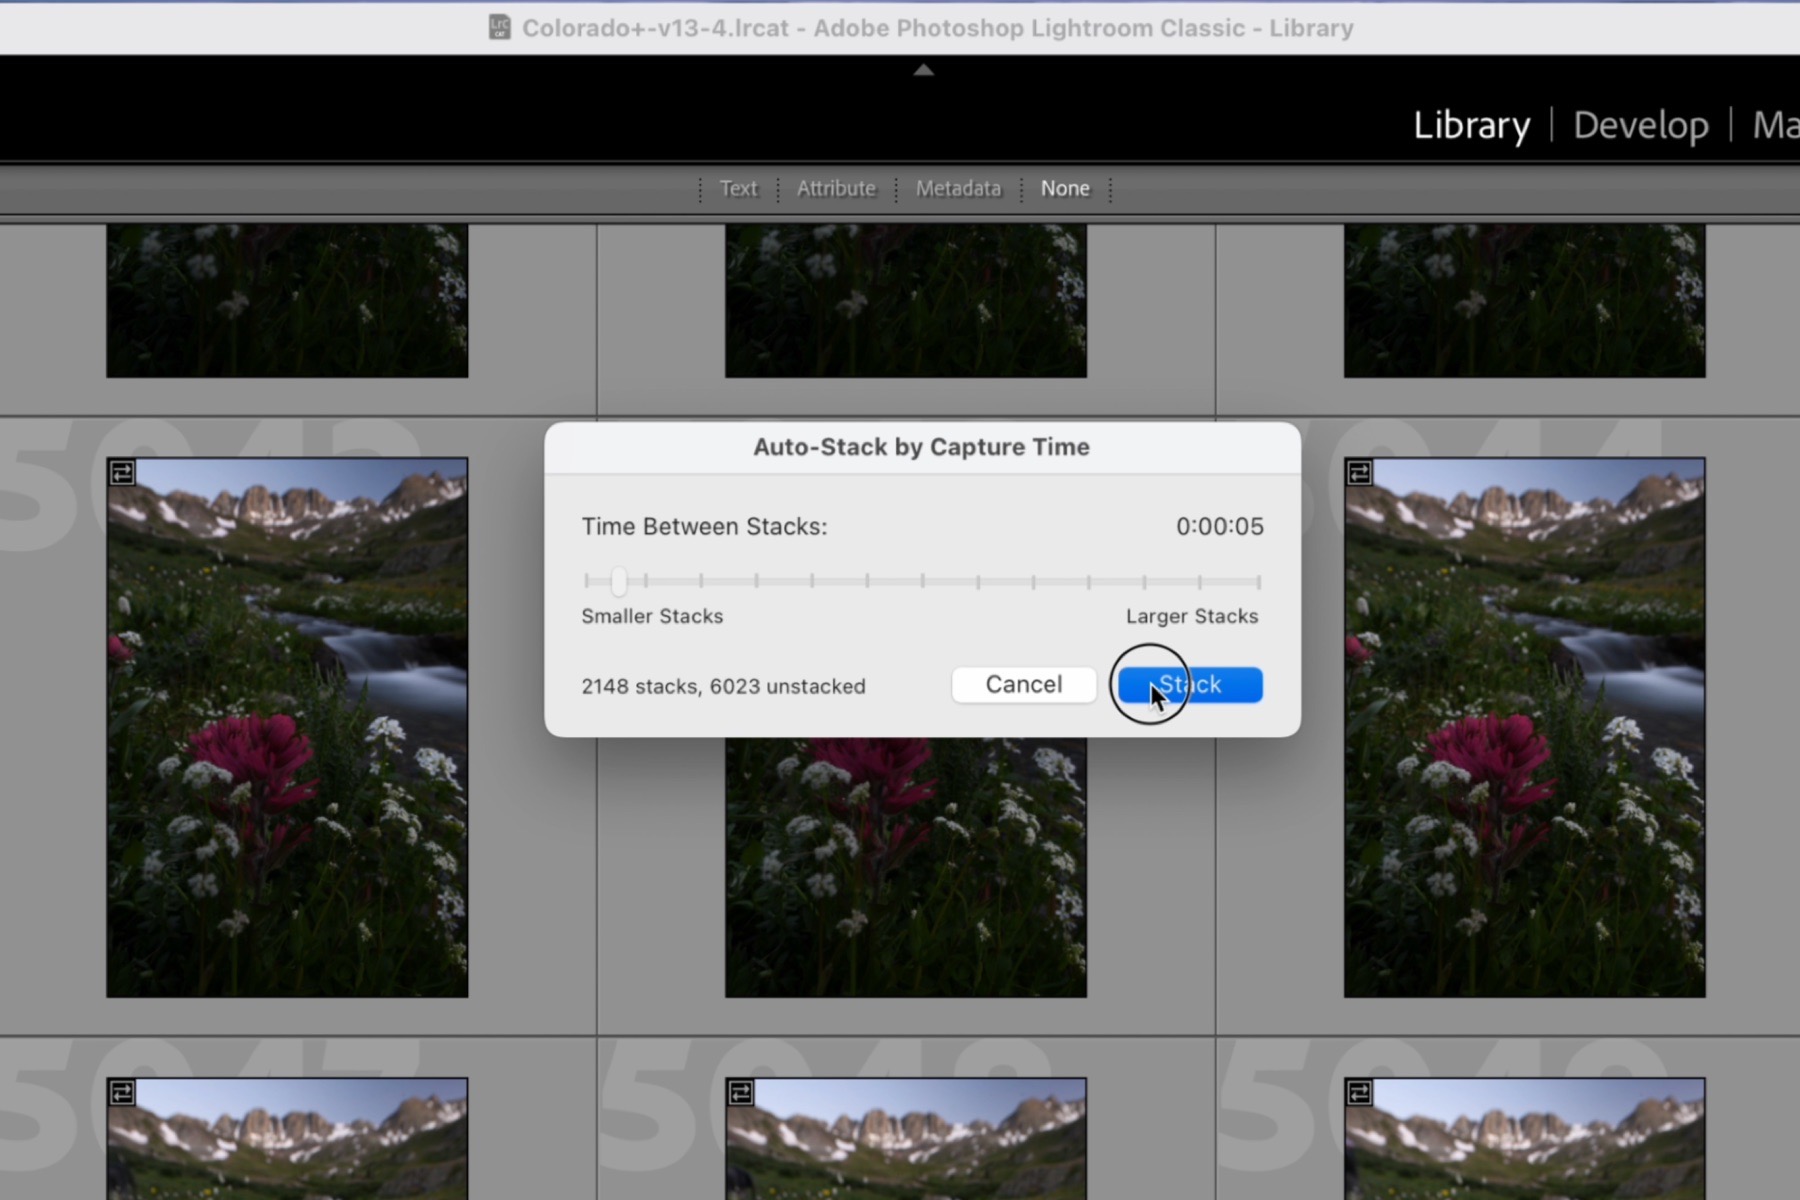
- Watch the predicted number of stacks and unstacked photographs before applying the change.
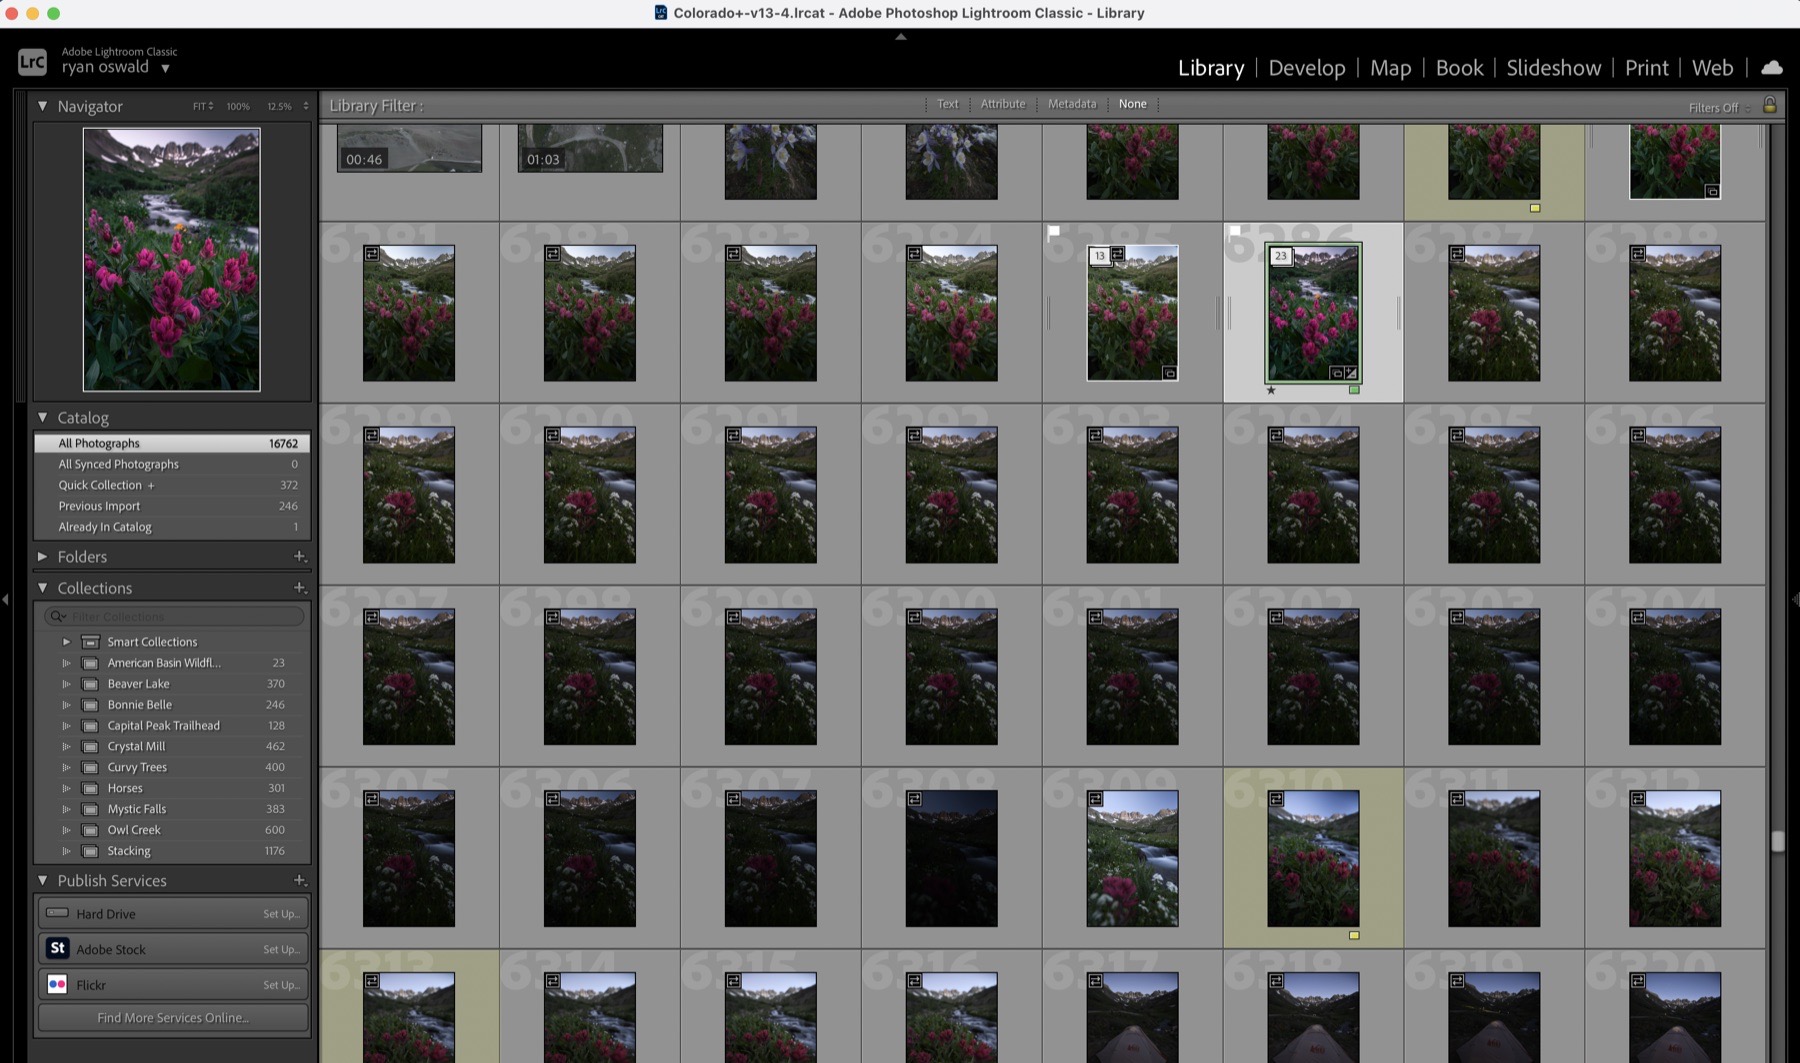
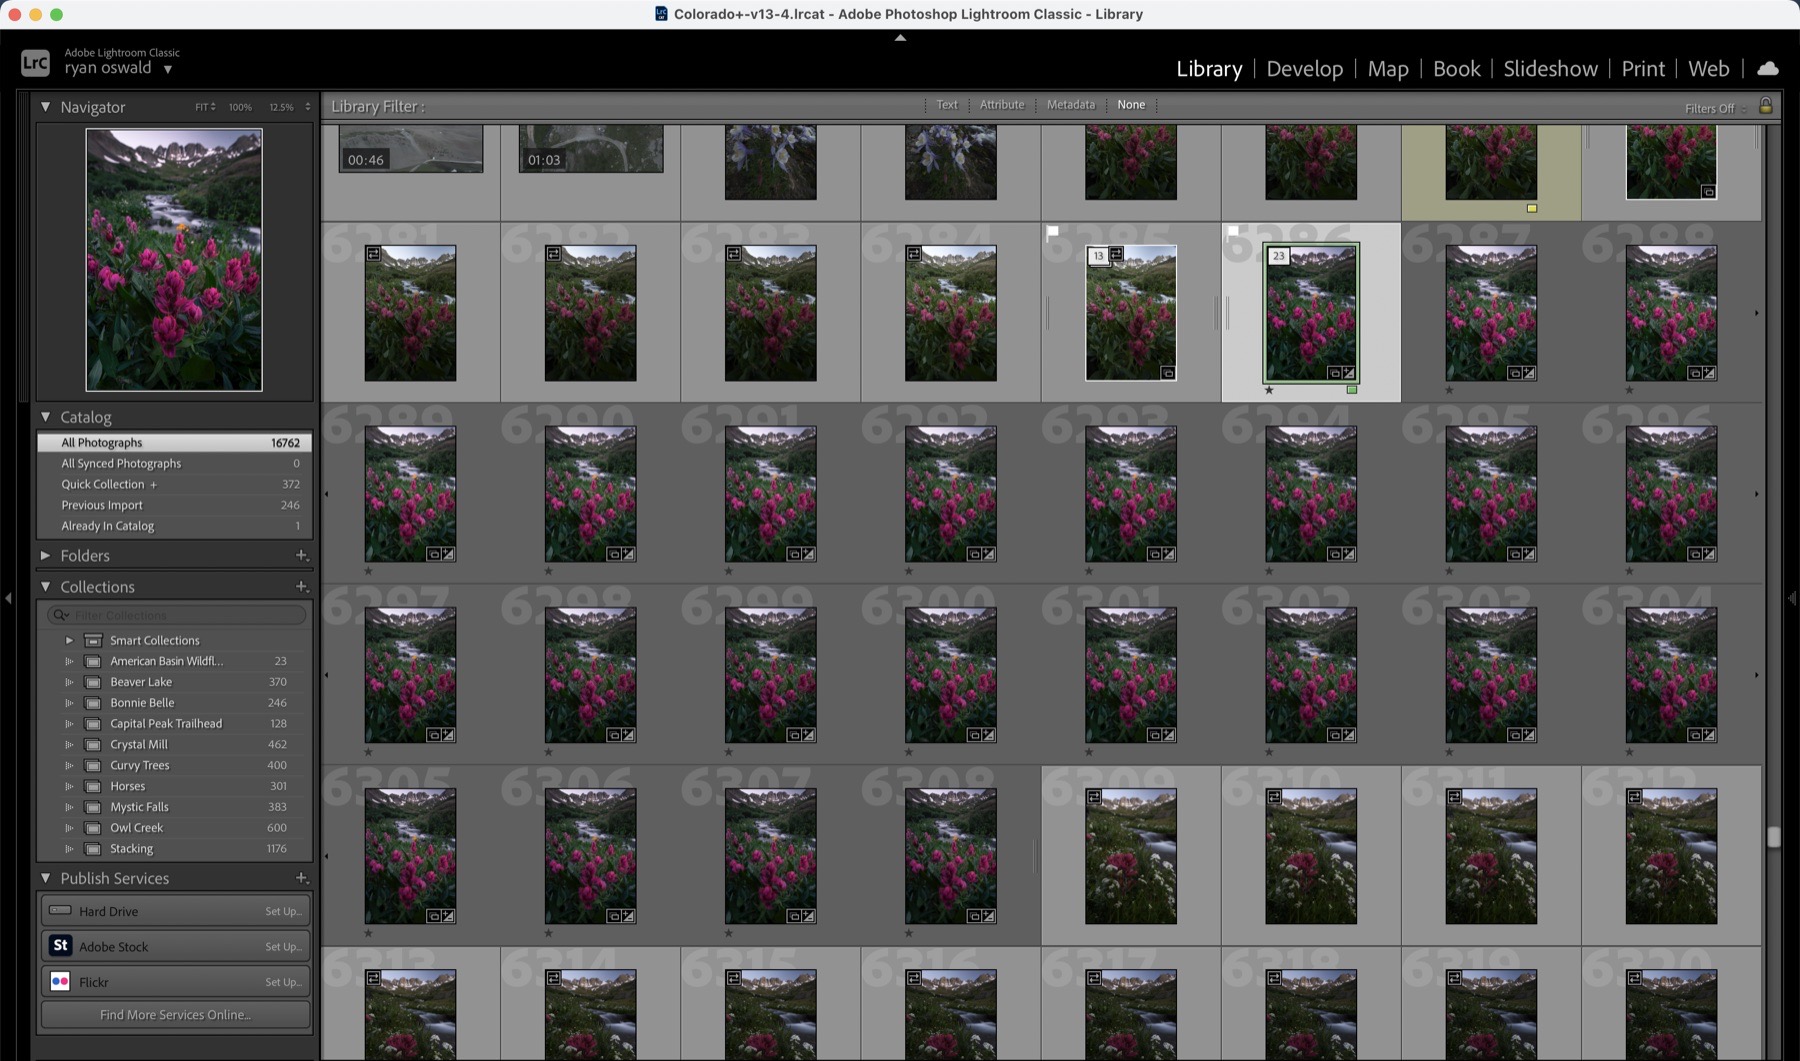
- Click Stack, then check the numbered badges in Grid view. Click a badge to expand or collapse its group.
Use wildlife bursts as behavior sized events
A burst-heavy wildlife shoot is easier to edit when the stack represents an event instead of an arbitrary batch of files. Imagine 1,500 eagle frames in chronological order: perching, takeoff, a fishing attempt, recovery, a second attempt, a chase and a landing. The pauses between bursts can separate those moments automatically.
Collapse the stacks and the shoot becomes a short event map. Open the takeoff stack to compare wing position. Open the fishing stack to check focus, talons, fish and spray. Open the chase stack to compare separation and eye contact. You are still choosing the photograph, but you are making one smaller decision at a time.
The same approach works for feeding, courtship, displays, nest exchanges and short interactions between several animals. If you hold the shutter through several behaviors with no pause, Lightroom may keep them together. Split that stack manually or use a shorter interval on the next pass.
| Field event | What a useful stack isolates | What I compare |
|---|---|---|
| Takeoff | The lean through the first full wingbeats | Head angle, talons and wing position |
| Fishing attempt | Approach, strike, splash and lift-out | Focus, fish visibility and clean wing edges |
| Chase | One continuous pursuit | Subject separation, eye contact and overlap |
| Landing | Final approach through touchdown | Feet, wings and perch clearance |
| Feeding | A short feeding action between pauses | Gesture, food visibility and interaction |
| Courtship | One display or exchange | Body language, timing and subject separation |
Find the right wildlife interval
For fast wildlife bursts, I start around one second. That is a practical first test, not a Lightroom rule and not a promise that every shoot will group perfectly.
If one behavior is split into several stacks, increase the interval. If separate behaviors are being combined, decrease it. Unstack the result, change the slider and try again until most groups match the way you remember the action.
Burst rate, how long you keep the shutter down and how quickly the animal changes behavior all affect the result. A one-second gap may work for eagle fishing attempts and fail for a slower feeding sequence. Let the photographs tell you where the useful boundary is.
- Start around 1 second for a burst-heavy wildlife shoot.
- Increase the interval when one event becomes multiple stacks.
- Decrease the interval when separate events combine into one stack.
- Inspect several stacks before committing to the whole folder or collection.
Combine Assisted Culling with Auto-Stack
Assisted Culling and Auto-Stack solve different problems. Assisted Culling helps surface likely technical failures. Auto-Stack organizes the remaining sequence by time. Used together, they turn a large wildlife import into a controlled review instead of asking software to make the final creative choice.
- Import the shoot into Lightroom Classic.
- Use Assisted Culling to flag or filter obvious focus failures, misfires and exposure problems. Review the result before removing anything.
- Select the folder or regular collection that defines the scope.
- Run Auto-Stack by Capture Time and tune the interval until the groups make sense.
- Collapse all stacks, then review one behavior or event at a time.
- Promote the winner so it becomes the top image in the collapsed stack.
Review one stack and promote the winner
A collapsed stack shows one thumbnail and a badge with the number of photographs inside. Expand it, compare focus, gesture, wing position and background, then select the best frame and choose Photo → Stacking → Move to Top of Stack. Shift+S is the shortcut.
Collapse the stack again and your choice becomes the visible thumbnail. Stacking does not rate, merge or delete the other frames. They stay in the catalog and remain available whenever you reopen the group.
Remember that ratings, flags and Develop adjustments applied while a stack is collapsed affect the top photograph, not every hidden file. Expand the stack before making a change that should apply to more than the winner.
Treat stack boundaries as a rough field log
Once the interval fits the shoot, the stack boundaries can act like a rough field log. Expand a stack and check the first and last capture times to see when one burst started and ended. Move to the next stack and the gap shows how long you waited before the next sequence.
That can help you reconstruct when the first fishing attempt happened, how long a chase lasted or whether several courtship exchanges were close together. It is useful context when writing field notes or comparing activity across a session.
Keep the idea in its proper place: Lightroom is reading timestamps, not recognizing wildlife behavior. A pause often marks a new event because of how you used the shutter. It is an inference from your shooting rhythm, not an AI behavior log.
Use Auto-Stack beyond wildlife
The same capture-gap method stays useful across several Lightroom Classic workflows. Match the interval to the way the sequence was made, not to a universal preset.
- Milky Way sequences: group each clean run of sky exposures so the files for one stack stay together. Start with a short gap and increase it only if one run is split.
- Focus stacks: keep each near-to-far focus sweep together. A short interval usually separates one sweep from the next composition.
- HDR brackets: isolate each exposure bracket before Photo Merge. The Create Stack option for the merged DNG is a separate post-merge convenience.
- Panoramas: group the frames from one pan, then start a new stack when you pause or change composition.
Frequently asked questions
What does Auto-Stack by Capture Time do in Lightroom Classic?
It groups contiguous photographs in a folder or regular collection according to the time gap between their capture timestamps. A gap that reaches the chosen interval starts a new stack.
What interval should I use for wildlife bursts?
Start around one second, inspect several groups and adjust. Increase the interval if one event is split. Decrease it if separate events are combined. One second is a starting point, not a rule.
Can Lightroom separate takeoffs, fishing attempts and other wildlife events?
Only indirectly. Lightroom uses capture timestamps, not behavior recognition. The method works when your pauses between bursts happen to match the boundaries between wildlife events.
Does stacking delete or merge the original files?
No. A stack is an organizational group inside the Lightroom Classic catalog. The original photographs remain separate. Unstacking removes only the group.
How do I change the top image in a Lightroom stack?
Expand the stack, select the frame you want and choose Photo → Stacking → Move to Top of Stack. You can also press Shift+S.
What is the difference between Auto-Stack and Assisted Culling?
Auto-Stack organizes photographs into groups by time. Assisted Culling analyzes criteria such as focus, misfires and exposure issues to help narrow a shoot. Use culling for technical filtering and stacking for event by event review.
A useful workflow removes repeated decisions while protecting the choices that make the photograph personal.